

Please note: This website contains affiliate links. As an Amazon Associate, we earn from qualifying purchases at no additional cost to you.
.
If you’ve spent any time around here, you already know I have a bit of a homemade body butter obsession. At this point, I’m basically one cute glass jar away from opening my own tiny apothecary. 😂
But after making so many of my favorite DIY body butter recipes, I decided it was time to mix things up and experiment with a few ingredients I hadn’t used as much before. That’s when I started reading about all the almond oil benefits for skin—and, naturally, my first thought was, Well, obviously I need to put this in a body butter.
And I’m so glad I did.
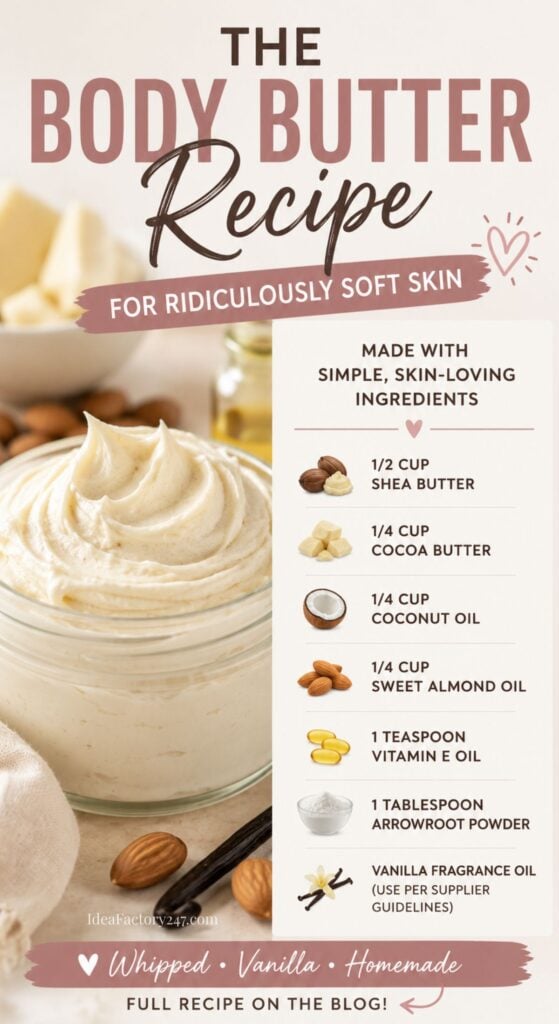
This whipped vanilla body butter recipe combines rich shea and cocoa butters with sweet almond oil to create this ridiculously soft, fluffy texture that melts right into your skin. Add a warm hint of vanilla, and it smells just sweet enough without making you feel like you’ve dipped yourself in cupcake frosting.
It’s simple to make, wonderfully moisturizing, and has quickly earned a spot in my ever-growing collection of homemade body butters. Apparently, I’m not getting over this obsession anytime soon.
Why This Vanilla Body Butter Has Become a New Favorite
I love making my own body butter because I can play around with the ingredients until I get the texture just right.
For this one, the combination really works. Shea and cocoa butter give it that rich, creamy consistency, while sweet almond oil makes it silkier and easier to spread.
Then there’s the vanilla. It’s warm, cozy and slightly sweet without being overpowering.
And my not-so-secret ingredient? A little arrowroot powder. It helps cut down on the heavy, oily feeling you sometimes get with DIY body butter, leaving this one rich and moisturizing without making you feel freshly glazed.
Whipped Vanilla Body Butter Recipe
This recipe makes approximately 1¼ to 1½ cups of whipped body butter, depending on how much air you whip into it.
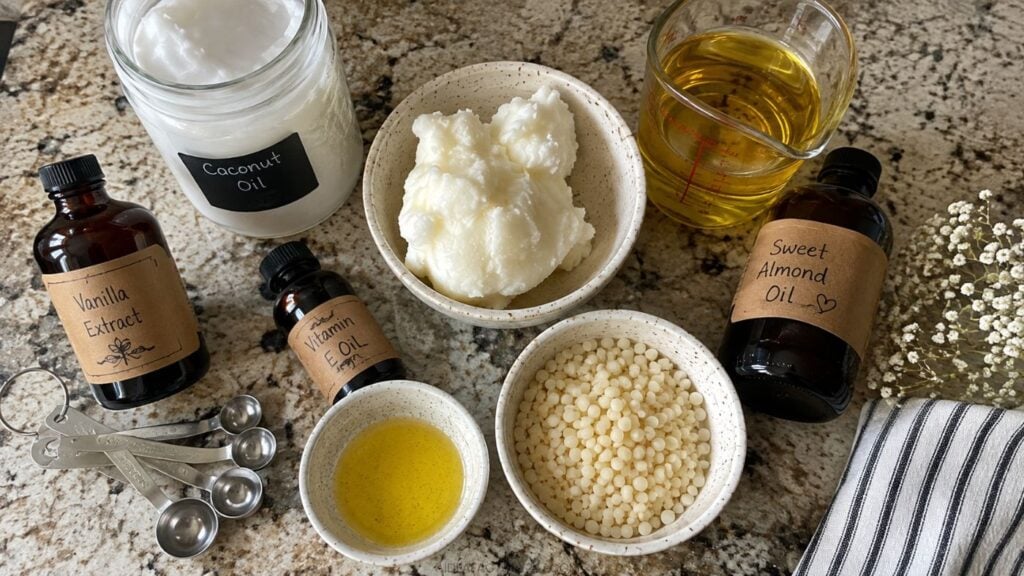
Ingredients
- ½ cup shea butter
- ¼ cup cocoa butter
- ¼ cup coconut oil
- ¼ cup sweet almond oil
- 1 teaspoon vitamin E oil
- 1 tablespoon arrowroot powder
- Skin-safe vanilla fragrance oil or vanilla oleoresin, used according to the supplier’s recommended dermal usage rate
A quick note about the vanilla: Skip the vanilla extract from your baking cabinet. Regular vanilla extract contains water and alcohol and won’t incorporate properly into an oil-based body butter. Choose a vanilla ingredient specifically intended for cosmetic use instead.
How to Make Body Butter
- Add the shea butter, cocoa butter and coconut oil to a heat-safe bowl or double boiler.
- Gently heat over simmering water, stirring occasionally, just until the solid ingredients have completely melted.
- Remove from the heat and stir in the sweet almond oil.
- Let the mixture cool for several minutes, then stir in the vitamin E oil and your skin-safe vanilla fragrance.
- Place the bowl in the refrigerator for about 30–60 minutes. You’re looking for a mixture that’s beginning to solidify around the edges but is still soft in the center—think softened butter rather than a hockey puck.
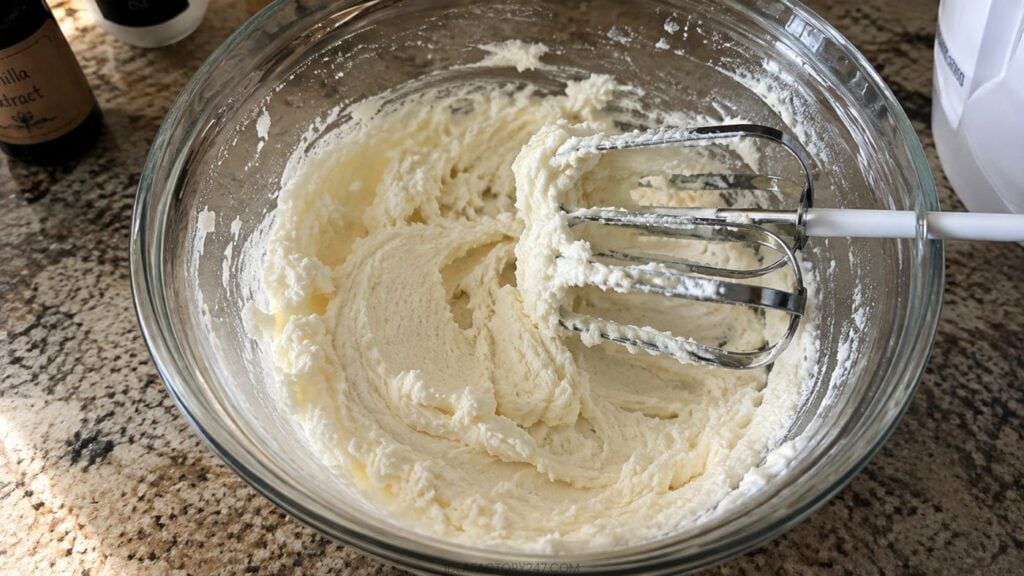
- Using a hand mixer or stand mixer, whip for 3–5 minutes, until noticeably lighter and fluffier.
- Sprinkle in the arrowroot powder and whip again until completely incorporated.
- If the body butter still seems too soft, refrigerate it for another 10–15 minutes and whip it a second time. This is often what creates that gorgeous, almost frosting-like texture.
- Spoon the finished vanilla body butter into clean, completely dry glass jars and cover.
The Secret to Really Fluffy Homemade Body Butter
Temperature is probably the biggest trick to getting a truly fluffy whipped body butter recipe.
If you try whipping the oils while they’re still warm and completely liquid, you’ll mostly be whipping a bowl of oil. Let them get rock-hard in the refrigerator and your hand mixer is going to wonder what it ever did to you.
The sweet spot is partially solid but still soft enough to easily press with a spoon.
And don’t be afraid of that second chill-and-whip. Whipping once, chilling briefly and whipping again can create a noticeably lighter texture.
Yes, at this point it will look suspiciously like frosting.
Please don’t eat the body butter. 😂
Almond Oil Benefits for Skin: Why I Added It
Sweet almond oil turned out to be a pretty perfect addition to this recipe.
It’s an emollient, which means it helps soften and smooth the skin and reduce moisture loss. Sweet almond oil also contains fatty acids and naturally occurring vitamin E.
But there’s another reason I particularly like almond oil for skin in homemade body butter: the texture.
Shea and cocoa butter are wonderfully rich, but they’re also solid and fairly heavy. Sweet almond oil loosens everything up, giving the finished body butter a silkier texture and making it easier to spread over your skin.
There are plenty of sweet almond oil uses in skin care, but after experimenting with it here, homemade body butter may be my favorite.
Note: Sweet almond oil is derived from almonds, so this recipe isn’t an appropriate choice for everyone with an almond or tree-nut allergy. Another carrier oil can be substituted if needed.
What’s Actually in This DIY Body Butter?
Here’s the quick version of what each ingredient brings to the party:
| Ingredient | What It Does |
|---|---|
| Shea butter | Creates a rich, creamy base and helps soften dry skin. |
| Cocoa butter | Adds firmness and gives the butter its luxurious, melt-on-contact texture. |
| Coconut oil | Helps the body butter glide easily over the skin. |
| Sweet almond oil | Lightens the heavier butters and adds a silky, spreadable feel. |
| Vitamin E oil | Adds antioxidant properties to the oil blend. |
| Arrowroot powder | Helps reduce some of the greasy feel and creates a silkier finish. |
| Vanilla | Gives the body butter its warm, cozy scent. |
One important distinction: vitamin E is an antioxidant, not a preservative.
How to Make Body Butter Feel Less Greasy
This may be the number-one complaint about homemade body butter. It’s made primarily from oils and butters, so it isn’t going to disappear instantly like a lightweight lotion—but you don’t need to walk around looking freshly buttered, either.
The arrowroot powder helps tremendously. If you prefer an even drier finish, you can experiment with adding another teaspoon or two.
The other trick is simply using less.
Start with a small amount and massage it thoroughly into your skin before reaching for more. I especially like applying it after a shower while my skin is still slightly damp. You get all that rich moisture, but a surprisingly small scoop can cover quite a bit of skin.
5 Easy Ways to Customize Your Vanilla Body Butter
Once you’ve made the original version, this body butter recipe is incredibly easy to play around with.
| Variation | What to Try |
|---|---|
| Vanilla Lavender | Pair the vanilla with a skin-safe amount of lavender essential oil for a soft, relaxing scent. |
| Vanilla Orange | Add sweet orange for a warm, creamsicle-inspired combination. Check the specific oil’s skin-use guidance before using citrus essential oils. |
| Vanilla Sandalwood | Combine vanilla with a skin-safe sandalwood fragrance for something warm and a little less sweet. |
| Coffee Vanilla | Use a cosmetic-grade coffee fragrance with the vanilla for a cozy coffee-shop scent. |
| Unscented Almond | Leave out the fragrance entirely and let the natural ingredients do their thing. |
Whichever combination you try, always follow the manufacturer’s skin-use and dilution guidelines for fragrance and essential oils.
Troubleshooting Your Whipped Body Butter
Why did my body butter turn grainy?
Shea butter can sometimes develop tiny grains when it melts and then cools too slowly or goes through repeated temperature changes. Cooling the freshly melted mixture relatively quickly in the refrigerator can help prevent this.
If your finished body butter does become grainy, don’t toss it. Gently remelt it, cool it again and re-whip.
Why isn’t my body butter whipping?
It’s probably still too warm. Pop the mixture back into the refrigerator until the edges are solidifying and the center has the consistency of soft butter. Then try whipping again.
If you’ve gone too far and chilled it completely solid, just let it soften slightly at room temperature before trying again.
What if my body butter is too soft?
Warm rooms can make body butter much softer, particularly because this recipe contains coconut oil.
Try chilling and re-whipping it first. If you’re making it during particularly warm weather, you may also find that it needs to be stored somewhere cooler.
Can You Substitute the Sweet Almond Oil?
Yes. Even though sweet almond oil is one of the stars of this particular DIY body butter recipe, you can experiment with other cosmetic carrier oils.
Jojoba oil, apricot kernel oil or grapeseed oil are a few possibilities.
Just remember that different carrier oils have different weights and absorption rates, so changing the oil can change the texture of your finished body butter.
I’d make the original recipe with sweet almond oil at least once. Then you have a baseline before you start experimenting.
And then all bets are off. That’s how the body-butter obsession begins.
How to Store Homemade Body Butter
Spoon your finished body butter into a clean, completely dry container with a tight-fitting lid and store it somewhere cool and dry, away from direct sunlight and heat.
Because this recipe doesn’t contain added water, it doesn’t require the same preservation system as a water-based lotion. However, keeping water out of the jar is important, so avoid dipping wet fingers into it after a shower.
I prefer making smaller batches that I can use within a few months rather than making enough body butter to moisturize a small village.
Also remember that whipped body butter can melt.
A sunny windowsill, hot bathroom or summer car can turn that beautiful fluffy texture back into liquid oil. If it melts, you can usually cool it back down and whip it again.
Other Popular DIY Body Butter Recipes + Tips:
- How to Make Whipped Magnesium Body Butter | Easy DIY Recipe
- DIY Shimmer Body Butter -| Shimmer Recipe for Radiant Skin
- DIY Coffee Body Butter for Smooth, Glowing Summer Skin
- Gingerbread Body Butter: The Ultimate DIY Holiday Gift Idea
Vanilla Body Butter Recipe: Frequently Asked Questions
Can I use regular vanilla extract in body butter?
I wouldn’t. Culinary vanilla extract typically contains water and alcohol, so it doesn’t incorporate properly into this oil-based recipe. Use a vanilla ingredient specifically intended for cosmetic formulations instead.
Does homemade body butter need a preservative?
An anhydrous—or water-free—body butter generally doesn’t require the same broad-spectrum preservation system as a water-based lotion. Keep your containers and utensils clean and dry, and don’t add water-based ingredients to this recipe without properly reformulating and preserving it.
Can I make this without coconut oil?
You can experiment with substitutions, but coconut oil contributes to the firmness of the finished butter. Replacing it with a liquid carrier oil will likely result in a much softer body butter.
Can I use this vanilla body butter on my face?
I designed this as a body butter, not a facial moisturizer. It’s quite rich and contains ingredients and fragrance that may not be ideal for facial skin, so I’d keep this one for the body.
How can I make the homemade body butter feel less greasy?
The easiest trick is to add arrowroot powder, which helps absorb some of the excess oil and gives homemade body butter a silkier, less-greasy finish. Start with about 1 tablespoon per 1 to 1½ cups of body butter, whip it in thoroughly, and remember to apply the finished butter sparingly—a little goes a surprisingly long way.
One Last Warning From a Body Butter Addict
Making your first whipped body butter recipe seems innocent enough.
Then you buy sweet almond oil. Then you decide you need cocoa butter. Suddenly you’re researching carrier oils at 11 p.m. and wondering whether you own enough tiny glass jars.
So consider yourself warned.
But as obsessions go, having a cabinet filled with ingredients that let you whip up ridiculously soft, vanilla-scented body butter isn’t the worst one to have. 😄
Please note: This website contains affiliate links. As an Amazon Associate, we earn from qualifying purchases at no additional cost to you.
.