
Please note: This website contains affiliate links. As an Amazon Associate, we earn from qualifying purchases at no additional cost to you.
.
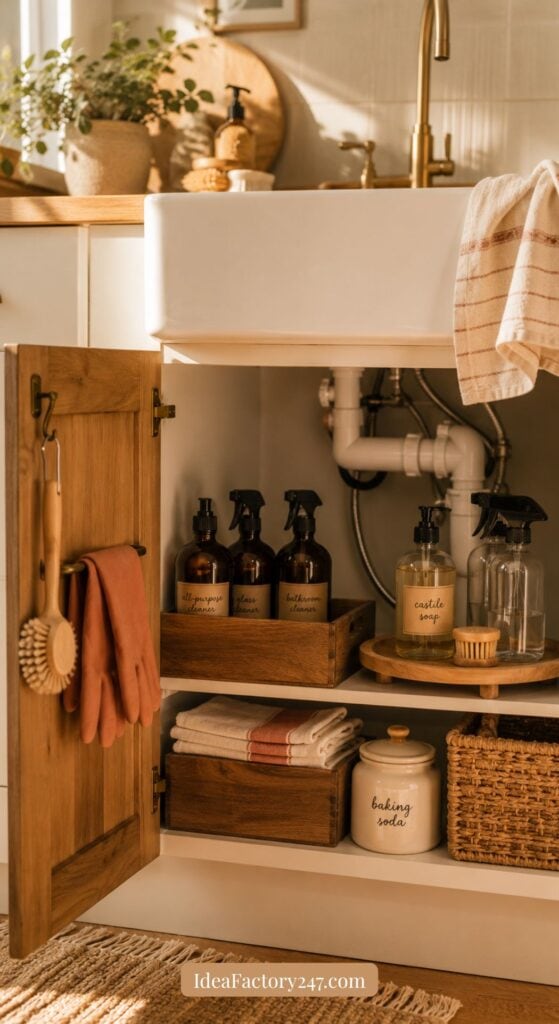
The cabinet under the kitchen sink has a way of becoming the kitchen’s version of a junk drawer — good intentions going in, chaos coming out. Half-used cleaners, mystery bottles, and a rubber glove that somehow lost its partner.
If you’ve been making the switch to natural cleaning products, it can actually get more chaotic before it gets better. You’ve got glass bottles instead of plastic ones, bulk castile soap, refill pouches, baking soda in a jar — it’s a different system, and it needs a different setup to work.
The good news? Under kitchen sink organization doesn’t have to be a big project. With the right approach, you can transform that cabinet into a calm, functional, genuinely pretty space in just a few simple steps.
Here’s exactly how to do it — the natural home way.
Step 1: Pull Everything Out and Start Fresh
Before you buy a single organizer, take everything out of the cabinet and put it on your kitchen floor. Yes, everything.
This is your reset moment — and honestly, it’s also a great opportunity to let go of the toxic products you’ve been replacing. If you’ve been transitioning to natural cleaners, those old bottles of conventional spray cleaner and chemical drain unclogger don’t need to come back in. Donate what can be donated, dispose of the rest responsibly, and give the cabinet a good wipe down before anything goes back in.
What you’re looking for at the end of this step: an empty, clean cabinet and a pile of items you actually want to keep.
Step 2: Decide What Actually Belongs Under Your Sink
Not everything that ended up under the sink belongs under the sink. This is a prime kitchen real estate spot — treat it that way.
What belongs here:
- Dish soap and dish soap refills
- Your daily-use natural cleaning sprays
- Cleaning cloths, Swedish dishcloths, or bamboo rags
- Sponges and scrub brushes
- Compostable trash bags
- Baking soda and castile soap (in labeled containers)
- Natural drain maintenance supplies (white vinegar, baking soda)
- Rubber gloves
- Extra hand soap refills
What should move somewhere else:
- Overflow pantry items
- Tools that “ended up there”
- Extra paper towels (linen closet or pantry shelf)
- Anything you haven’t touched in 6 months
The goal is a focused, intentional cabinet — not a catch-all. For more on building out your complete natural cleaning supply kit, check out the Natural Cleaning Starter Kit post for a full list of what a natural home actually needs.
Step 3: Measure Your Space (The Step Everyone Skips)
Here’s where most people go wrong: they order an organizer without measuring first, and it doesn’t fit around the pipes or garbage disposal.
The plumbing and disposal take up a significant chunk of real estate under your sink, and the usable space on either side is often narrower and shorter than you’d expect.
Before you shop, measure:
- Total width of the cabinet interior
- Depth from front to back
- Height on the left side of the disposal
- Height on the right side of the disposal
The L-shaped pull-out organizers (more on those in the next step) are specifically designed to work around this layout, with a narrow top shelf on one side that clears the plumbing and a wider lower tier that reclaims the rest of the vertical space.
If you have a corner kitchen sink, you’ll have even less usable space — prioritize slim, stackable solutions and make the most of the door interior.
Step 4: Choose Your Storage Solutions
This is the fun part. For a natural home, the goal is function and aesthetics — because when your organizing supplies are beautiful, you’re more likely to keep the system going. Here are the best options:
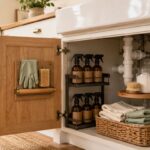
Two-Tier Pull-Out Shelf Organizer
This is the workhorse of under-sink organization. The L-shaped design works around your garbage disposal, and the pull-out bottom drawer means you never have to dig around blindly in the back of the cabinet again.
👉 Shop 2-Tier Metal Pull-Out Under Sink Organizers on Amazon
Lazy Susan Turntable
A lazy Susan is a game-changer for glass spray bottles — just spin it to grab what you need without knocking everything over. Place it on the side of the cabinet opposite the disposal for easy daily access.
👉 Shop Lazy Susan Turntables on Amazon
Clear Bins and Baskets
Use these to group like items together — one bin for cleaning cloths, one for refills, one for dish soap supplies. Clear bins make it easy to see what you have at a glance. For a natural home aesthetic, look for bamboo-trimmed bins or ones with a clean, simple look.
Over-the-Door Organizer
Don’t forget the inside of the cabinet door — it’s valuable real estate. A slim over-the-door organizer is perfect for rubber gloves, scrub brushes, small sponges, and other grab-and-go items.
Bamboo Organizer Shelf
If you prefer a more natural material, a bamboo organizer adds warmth and texture while keeping things tidy. These work especially well for corralling glass bottles and jars.
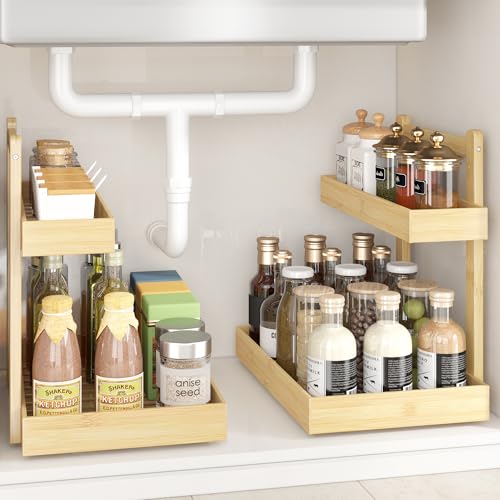
👉 Shop Bamboo Under Sink Organizers on Amazon
Wood or Bamboo Stackable Shelving
Depending on how tight the space is, these always work like a charm for me. They come in a pack of two, so even if you can’t stack on top of one another, you can put one on each side of the cabinet. It really adds some much-needed storage space.

NEX Kitchen Cabinet Shelf Organizer
Shop on Amazon
$25.19
We earn a commission if you make a purchase, at no additional cost to you.
06/07/2026 07:03 am GMT
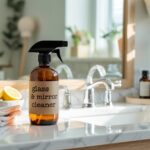
Glass Spray Bottles
If you’re storing DIY cleaning sprays, glass bottles are the natural home standard — they don’t leach chemicals into your cleaners, they look beautiful, and they last for years. Amber glass offers extra UV protection for any light-sensitive formulas.
👉 Shop Amber Glass Spray Bottles on Amazon
Step 5: Set Up Your Zones
Now it’s time to actually put things back — but intentionally, in zones based on how you use them.
Think of the cabinet as having three zones:
Zone 1: Daily Use (front and center) Everything you reach for every single day goes here within easy reach — your dish soap refill, a couple of cleaning cloths, your all-purpose spray, and your scrub brush. If you use the lazy Susan, this is what goes on it.
Zone 2: Dish and Sink Area (right side) Sponges, dish soap extras, drain maintenance supplies (baking soda + vinegar for keeping your garbage disposal fresh), rubber gloves. Everything related to the sink itself lives here.
Zone 3: Refills and Extras (back or pull-out bin) Bulk refills, extra trash bags, backup supplies. The rule: only restock Zone 1 when it runs out — don’t just pile more in. This keeps the whole system from creeping back into chaos.
Step 6: Build Your Natural Cleaning Supply Setup
This is where the natural home angle really shines. Here’s a suggested lineup of what to keep under the sink for a fully non-toxic kitchen cleaning setup:
- DIY All-Purpose Cleaner in a labeled glass spray bottle — grab the recipe from the DIY All-Purpose Cleaner post
- DIY Kitchen Degreaser for stovetops and greasy messes — see the DIY Natural Kitchen Degreaser post
- Natural dish soap (castile soap-based works great)
- Swedish dishcloths or bamboo cleaning cloths — reusable, compostable, and they replace paper towels beautifully
- Baking soda in a labeled glass jar with a lid
- Castile soap concentrate in a pump or squeeze bottle
- Compostable trash bags
- White vinegar in a small container for drain maintenance
- Rubber gloves
- Natural scrub brush (wood handle, natural bristles)
For a full breakdown of the non-toxic cleaning supplies worth having, the Natural Cleaning Starter Kit walks through everything room by room.
If you make your own fabric softener or laundry supplies, those belong in the laundry area rather than under the kitchen sink — check out the DIY Fabric Softener post for that setup.
Step 7: Deal with the Garbage Disposal
The disposal is the elephant in the cabinet — it takes up prime real estate and makes layout tricky. Here’s how to work with it instead of around it:
Use the space on one side for your daily-use zone (the lazy Susan and spray bottles work great here), and the other side for your refills-and-extras bin.
Keep your drain maintenance supplies right here too — a small jar of baking soda and a bottle of white vinegar make it easy to do a quick drain refresh anytime. Just pour baking soda down the drain, follow with vinegar, wait a few minutes, and flush with hot water. It takes two minutes and keeps your disposal fresh and odor-free. For a full natural garbage disposal cleaning routine, the How to Clean a Garbage Disposal Naturally post has you covered.
One more tip: if you have a corner sink or an unusually large disposal, don’t fight the layout — a rolling cart that pulls out from under the sink entirely can be a smarter solution than trying to wedge organizers around awkward plumbing.
Step 8: Label Everything and Set a Monthly Reset
This last step is what separates a cabinet that stays organized from one that quietly falls apart over the next three months.
Label everything. This is especially important in a natural home where many of your products look similar — glass bottles of clear or slightly amber liquid need labels so you (and anyone else in your household) know exactly what’s what. A simple label maker or even kraft paper labels with a marker work perfectly.
Set a monthly 5-minute reset. Once a month, open the cabinet, pull out anything that’s migrated in from elsewhere, restock Zone 1 from Zone 3, wipe down the shelves, and close it back up. That’s it. Five minutes and the system resets itself.
Follow the one-in-one-out rule for cleaning supplies. When you buy a refill, the old container leaves. This keeps the cabinet from slowly expanding beyond its boundaries.
For a broader approach to keeping your whole home in this kind of effortless order, the Easiest Decluttering Habit post is a great companion read — it’s the same mindset applied everywhere.
Your Natural Under-Sink Cabinet Checklist
Here’s a quick shopping list if you’re starting from scratch:
| Item | Link |
|---|---|
| 2-tier pull-out shelf organizer | Shop on Amazon |
| Lazy Susan turntable | Shop on Amazon |
| Bamboo under-sink organizer | Shop on Amazon |
| Amber glass spray bottles | Shop on Amazon |
| Clear bins and baskets | Shop on Amazon |
| Natural scrub brush | Shop on Amazon |
| Compostable trash bags | Shop on Amazon |
| Swedish dishcloths | Shop on Amazon |
Don’t Want to Buy New? Fun Ideas to Repurpose What You Already Have
You don’t need to order a single thing to get this cabinet organized. Before you shop, take a look around your home — you may already have everything you need:
- Old wooden crates or wine boxes — perfect for corralling bottles and creating a rustic, intentional look
- Woven baskets or seagrass bins — great for grouping cleaning cloths, rags, or backup supplies; if they’re collecting dust in another room, put them to work here
- Mason jars or glass food jars — ideal for storing baking soda, castile soap bars, or loose sponges; just add a label
- Vintage tins or metal containers — sturdy enough to hold scrub brushes, rubber gloves, or small bottles upright
- A lazy Susan from another cabinet or your pantry — if you have one you’re not using, repurpose it here for your spray bottles
- Shallow trays or cutting boards — can act as drawer liners or dividers to keep things from sliding around
- Old cloth napkins or dish towels — line the bottom of baskets or bins to protect glass bottles and add a soft, finished look
The goal is a cabinet that works for your life — and sometimes the most beautiful systems are the ones built from what you already own. For more ideas on giving new life to old things, check out the Genius Upcycling Projects post.
The Bottom Line
Opening your under-sink cabinet and seeing a calm, clean, intentional setup is one of those small things that makes your whole kitchen feel more organized. And when everything in there supports a non-toxic, natural home, it feels even better.
The key is to treat this space as a working zone — not a storage catch-all. Give everything a home, label what needs labeling, and do a quick reset once a month. That’s really all it takes.
Ready to keep going? Here are a few related posts to help you build out the rest of your natural home cleaning system:
- Natural Cleaning Starter Kit: Everything You Need for a Non-Toxic Home
- DIY All-Purpose Cleaner
- DIY Kitchen Degreaser
- How to Clean a Garbage Disposal Naturally
- Plastic Free Made Easy
- The Easiest Decluttering Habit
Please note: This website contains affiliate links. As an Amazon Associate, we earn from qualifying purchases at no additional cost to you.
.