
Please note: This website contains affiliate links. As an Amazon Associate, we earn from qualifying purchases at no additional cost to you.
.
Fall down the simmer pot rabbit hole, and you quickly realize the recipe isn’t the tricky part. Toss in some cinnamon sticks, throw around a few cloves, add vanilla—done.
The real magic? The dried fruit that makes people ask, “Wait, you actually made this?”
But here’s the unglamorous truth: tossing fresh fruit into a mason jar doesn’t yield a charming handmade gift. It yields a fuzzy, biohazardous science experiment in about four days. Definitely not the vibe.
If you want fruit that holds its vibrant color, smells incredible, and doesn’t rot before it makes it under the tree, you’ve got to dry it right. Whether you’re pairing these with my Christmas Simmer Pot Recipes or building something from the Fall Simmer Pot Recipes roundup, here is how to dry citrus and apples like a pro (and avoid the mold drama entirely).
Why You Can’t Just Use Fresh Fruit in a Gift Jar
Fresh citrus and apple slices are mostly water — which is exactly why they mold, brown, and turn into something you’d rather not explain.
Drying pulls that moisture out, which does three things at once: it stops the mold, it concentrates the smell (hello, extra-fragrant simmer pot), and it turns fruit into something sturdy enough to layer, tie with twine, or pack into a jar without it turning to mush by the time it’s gifted.
How to Dry Orange Slices in the Oven
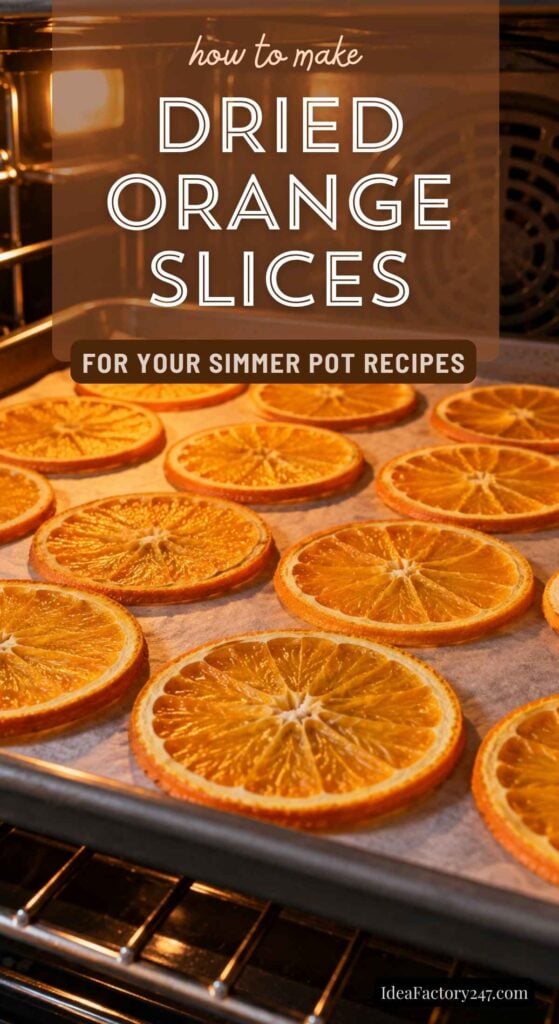
This is the method most people land on first, and for good reason — it’s hands-off and gives you that classic stained-glass look.
- Slice oranges about ¼-inch thick. Thinner slices dry faster but tear easily; thicker slices hold up better for garlands and gift toppers.
- Pat each slice dry with a paper towel to pull off surface moisture before it hits the oven.
- Lay slices in a single layer on a parchment- or silicone-lined baking sheet, without touching.
- Bake at 200°F (low and slow is the whole trick here) for 3–4 hours, flipping every hour so both sides dry evenly.
- Pull them once they’re firm and mostly dry but still slightly tacky in the center — they’ll finish hardening as they cool.
Every oven runs a little different, so start checking around the 2.5-hour mark. If your slices are curling up at the edges before the centers are dry, drop the temp another 10 degrees.
The Air Fryer Shortcut (For When You Don’t Have 4 Hours)
If your oven’s tied up making cookies for the fortieth batch of gifts, the air fryer gets you there faster.
- Set it to 175°F (or the lowest “dehydrate” setting your model has).
- Arrange slices in a single layer, leaving space between them for airflow.
- Dry for 1.5–2 hours, checking every 30 minutes and flipping halfway through.
It won’t get quite as crisp-edged as the oven method, but for a last-minute batch, it’s the move.
How to Dry Apples for Simmer Pots
Apples behave a little differently than citrus — they brown faster, so a quick pre-soak makes a real difference.
- Core the apple and slice it thin, about ⅛-inch, using a mandoline if you have one for consistency.
- Soak the slices for 5 minutes in water with a splash of lemon juice — this keeps them from browning while they dry.
- Pat dry, then arrange on a lined baking sheet in a single layer.
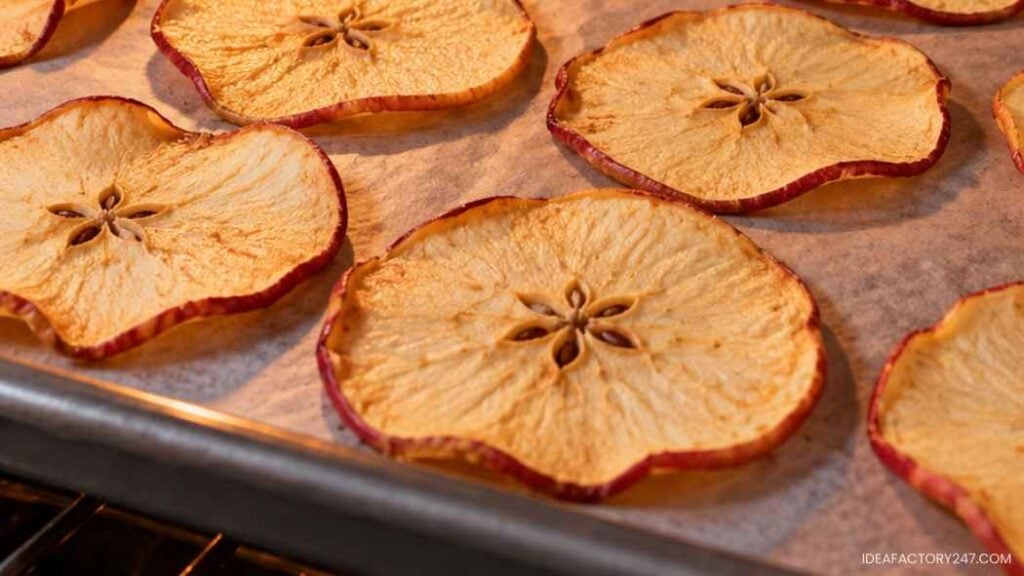
- Bake at 200°F for 2–3 hours, flipping halfway, until they’re leathery and dry to the touch.
- Sprinkle with cinnamon before baking if you want that classic simmer-pot smell baked right into the slice.
Apples dry a bit faster than oranges, so start peeking at the 2-hour mark.
Bonus: Dried Lemon Slices
Same process as the oranges — ¼-inch slices, 200°F, 3–4 hours. Lemon slices dry a touch faster since they’re thinner-skinned, so keep an eye on them starting around the 2.5-hour point.
They add a brighter, sharper note to a simmer pot blend and look great mixed in with the orange rounds.
How to Make It Actually Look Like a Gift (Not a Sad Snack Bag)
This is the part that separates “cute homemade gift” from “did she just forget to wrap something.” I go deep on packaging in my Simmer Pot Gift Ideas guide, including the full cost breakdown, but here’s the short version as it applies to the fruit you just dried:
- Jar or bag comes down to batch size. A mason jar looks more finished for a one-off gift and holds up better in storage, but if you’re making a dozen for a class or an office, clear cellophane or kraft paper bags cost a fraction as much and pack down easier for hauling a whole batch at once.
- String it into a garland instead of dropping it in loose. Thread dried orange and apple slices onto twine or baker’s string with a needle, alternating with a cinnamon stick every few slices, and wrap that around the jar or bag instead of a plain ribbon.
- If you’re using a jar, layer against the glass, bulkiest first. Put the orange and apple slices toward the outside where they actually show, then fill in behind them with cinnamon sticks and smaller spices — that’s the difference between a jar that looks styled and one that looks like it got shaken up in transit.
- Finish with a tag that tells them what to do. Something simple like “Simmer 3 slices + 1 cinnamon stick + 1 cup water on low — refills as it evaporates” turns it from a mystery jar into a ready-to-use gift.
I’ve been using these gift bags when I have to make a bunch….
Value Pick

Clear Celophane Gift Bag Bags (100)
Check Pricing on Amazon
$6.49
We earn a commission if you make a purchase, at no additional cost to you.
09/18/2026 05:55 am GMT
But I found these on amazon (so cute!) and am going to use these as my gift jars – and maybe keep a few for myself!

Cute Vintage Look Embossed Mason Jars (15 Pack)
View on Amazon
$26.99
We earn a commission if you make a purchase, at no additional cost to you.
09/17/2026 07:40 pm GMT
How Long Do Dried Orange Slices Last?
Stored in an airtight container away from direct sunlight, dried orange and apple slices last 6–12 months. Humidity is the real enemy here — if your kitchen runs damp, toss a food-safe silica packet in with them, or store the jar somewhere cool and dry.
What to Do With Your Dried Fruit Once It’s Ready
Once you’ve got a full batch cooling on the counter, the fruit itself is just the starting point. Pair it with one of the blends from Christmas Simmer Pot Recipes or Fall Simmer Pot Recipes, or head straight to Simmer Pot Gift Ideas: Easy DIY Jars for five ready-made blend combinations, a full packaging walkthrough, and a free printable gift tag.
How to Dry Orange Slices and Apples: FAQs
Can you eat dried orange slices, or are they just for decoration?
Both — a plain dried orange slice is perfectly edible and makes a nice garnish for drinks or baked goods. For simmer pot gifts specifically, they’re meant to be simmered for the scent, not eaten, but there’s no safety issue either way as long as no sugar or coating was added that you wouldn’t want heated.
Why did my orange slices turn brown instead of staying bright?
Usually one of two things: the oven ran too hot, or the slices sat too long before drying started. Sticking close to 200°F and getting them in the oven soon after slicing keeps the color from turning dull.
Do I need a dehydrator, or does the oven work just as well?
The oven works fine and is what most people already have. A dehydrator gives more even results at scale if you’re making a big batch of gifts, but it’s not a requirement to get a good outcome.
Can I speed up the drying time?
Raising the oven temperature seems like the obvious fix, but it just cooks the edges before the center dries out, leaving you with curled, unevenly dried slices. The air fryer method above is the real shortcut if time is tight.
Final Thoughts
I make a batch of these every single November, and every single year I forget how much space a full sheet pan of orange slices takes up in a 200-degree oven for four hours straight. Worth it every time — there’s something about a house that smells like an orange orchard while you’re doing literally nothing else that makes the whole holiday season feel like it’s actually arrived. Dry a big batch now, and you’ll have enough for every gift jar on your list without a repeat trip to the grocery store in December.
Please note: This website contains affiliate links. As an Amazon Associate, we earn from qualifying purchases at no additional cost to you.
.