Potluck food has one very important job: survive the drive and still be worth eating when you get there.
That sounds simple—right up until your crispy appetizer steams itself soft under foil, your carefully arranged skewers slide into one corner of the tray, or the dip you brought hot is barely lukewarm by kickoff.
The recipes below were chosen because they can handle a little time in the car and still taste good when the party begins. Some are best packed cold, a few belong in a slow cooker, and others are perfectly happy at room temperature. Every one includes enough information to actually make it, plus a specific plan for getting it to the party without creating a small food-related crisis in the passenger seat.
What Makes a Good Traveling Appetizer?
The best potluck appetizers have at least one of these qualities:
- They can be assembled ahead of time without becoming soggy.
- They taste good at room temperature and do not depend on being served piping hot.
- They fit securely in a shallow container instead of sliding, sloshing, or toppling.
- They can be kept cold in a cooler or warm in a slow cooker.
- Sauces, glazes, and garnishes can be added after you arrive.
The container matters almost as much as the recipe. Use shallow, rigid containers for skewers and bite-size foods, parchment between stacked layers, and towels or nonslip shelf liner underneath dishes in the car. If steam could ruin the texture, let the food cool for several minutes before closing the lid.
Quick Guide to the Best Potluck Appetizers
| If you need… | Try one of these |
|---|---|
| Something you can make the night before | Pinwheels, cheese ball, ranch pretzel mix, antipasto skewers, chocolate-covered pretzels |
| Something that does not need reheating | Caprese skewers, stuffed mini peppers, ham and pickle roll-ups, brownie bites |
| Something substantial enough for hungry football fans | Chicken bacon ranch sliders, BBQ meatballs, taco cups, sausage bites |
| Something that can stay warm in a slow cooker | BBQ meatballs, sweet and spicy kielbasa, spinach artichoke dip |
| Something sturdy for a longer drive | Cheese ball, pretzel mix, cornbread bites, brownie bites, chocolate-covered pretzels |
Easy Finger Foods That Travel Well
1. Sausage Cream Cheese Pinwheels
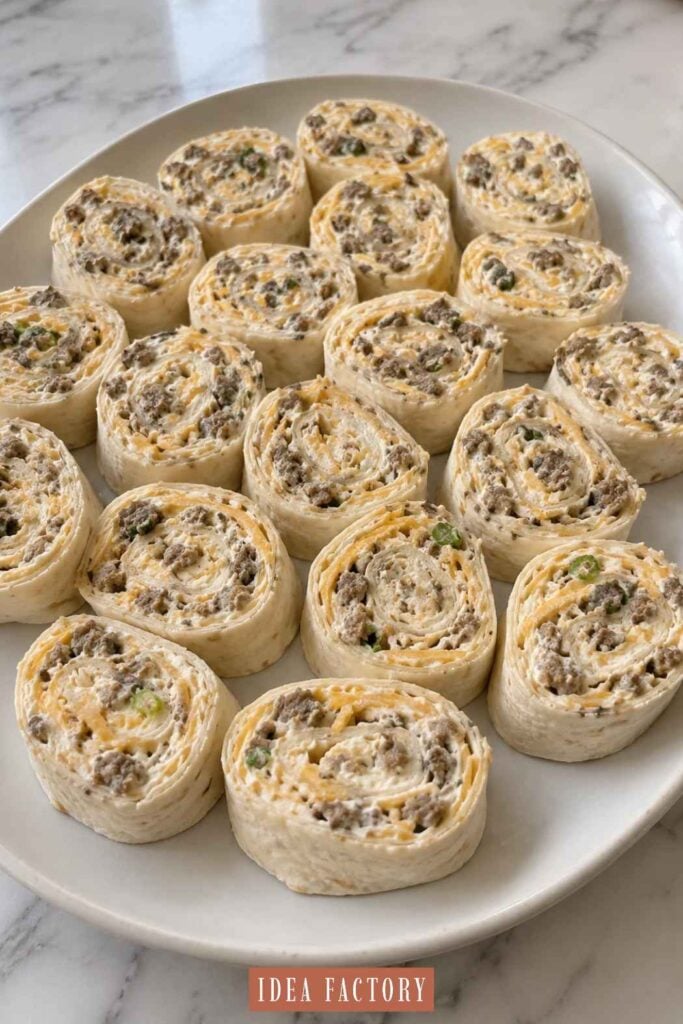
These are rich, peppery, and just messy enough to feel like party food—without actually falling apart in anyone’s lap. Chilling the filling before slicing is what gives you neat spirals instead of squashed tortillas.
Makes: About 32 pinwheels
Make ahead: Up to 24 hours
Ingredients
- 1 pound breakfast sausage
- 8 ounces cream cheese, softened
- 1/2 cup shredded sharp cheddar cheese
- 2 tablespoons finely sliced green onions
- 1/4 teaspoon garlic powder
- 4 large burrito-size flour tortillas
How to Make Them
- Cook the sausage in a skillet over medium heat for 8 to 10 minutes, breaking it into very small crumbles as it browns. Drain it thoroughly and let it cool for about 10 minutes.
- Stir together the cream cheese, cheddar, green onions, and garlic powder. Fold in the cooled sausage.
- Divide the mixture among the tortillas and spread it in a thin, even layer, leaving about 1/2 inch bare along one edge.
- Roll each tortilla tightly toward the bare edge. Wrap the rolls individually and refrigerate for at least 1 hour.
- Trim the uneven ends and cut each roll into eight 1-inch pinwheels.
Travel Tip: Arrange the pinwheels snugly in a single layer or place parchment between layers. Carry them in a cooler with ice packs and wait until shortly before leaving to slice them for the cleanest shape.
2. Bacon-Wrapped Dates
As dates roast, they become soft and caramel-like while the bacon turns crisp and salty around them. They look like the sort of appetizer that required planning, even though the prep is mostly wrapping and toothpicks.
Makes: 24 dates
Make ahead: Assemble up to 1 day ahead; bake before leaving
Ingredients
- 24 pitted Medjool dates
- 12 thin-cut bacon slices, cut in half crosswise
- 24 toothpicks
- 2 tablespoons maple syrup, optional
- Pinch of cayenne pepper, optional
How to Make Them
- Heat the oven to 400°F. Line a rimmed baking sheet with parchment or foil and place an oven-safe rack on top if you have one.
- Wrap each date with half a slice of bacon and secure it with a toothpick. Arrange the dates seam-side down on the rack or pan.
- Bake for 10 minutes, turn each date, and bake for another 10 to 15 minutes, until the bacon is browned and crisp.
- If you want a sweet-spicy finish, stir the maple syrup with a pinch of cayenne and brush it lightly over the dates during the final 3 minutes.
- Let them rest for 5 to 10 minutes before packing.
Travel Tip: Place the dates in a shallow container lined with parchment, not paper towels, which can stick to the glaze. Leave the lid slightly cracked until the dates stop steaming, then close it for the drive. They are good warm or at room temperature.
3. Chicken Bacon Ranch Sliders
These soft little sandwiches are unapologetically hearty: creamy ranch chicken, smoky bacon, cheddar, and buttery rolls. A layer of cheese on both sides protects the bread from the filling, so the sliders do not arrive wet and defeated.
Makes: 12 sliders
Make ahead: Prepare the filling 1 day ahead; assemble up to 2 hours before serving
Ingredients
- 3 cups finely shredded cooked chicken
- 1/3 cup thick ranch dressing
- 4 ounces cream cheese, softened
- 1/2 cup cooked crumbled bacon
- 2 tablespoons sliced green onions
- 1/4 teaspoon black pepper
- 12 attached slider rolls
- 8 thin slices cheddar or Colby Jack cheese
- 2 tablespoons melted butter
- 1/2 teaspoon dried parsley
How to Make Them
- Heat the oven to 350°F. Without separating the rolls, slice the entire slab horizontally.
- Mix the chicken, ranch, cream cheese, bacon, green onions, and pepper.
- Place the bottom slab of rolls in a lightly greased baking dish. Cover it with four cheese slices, spread the chicken mixture evenly over the cheese, and add the remaining cheese. Replace the top slab.
- Stir the melted butter and parsley together and brush it over the rolls.
- Cover loosely with foil and bake for 15 minutes. Uncover and bake for another 5 to 7 minutes, until the tops are lightly toasted and the cheese has melted.
- Rest for 5 minutes, then cut into individual sliders.
Travel Tip: Keep the sliders in the baking dish and cover them after most of the steam has escaped. For a drive longer than 30 minutes, transport the cooled sliders in a cooler and reheat them at the party rather than trying to keep them vaguely warm for hours.
4. Mini Taco Cups
These have crisp wonton edges, well-seasoned beef, and enough melted cheese to hold everything together. Keeping the wet toppings off until serving means they remain taco cups instead of becoming tiny taco casseroles.
Makes: 24 taco cups
Make ahead: Cook the meat 2 days ahead; bake the cups the day of the party
Ingredients
- 1 pound lean ground beef or turkey
- 2 tablespoons taco seasoning
- 1/3 cup water
- 24 wonton wrappers
- 1 cup shredded Mexican-blend or cheddar cheese
- 1/3 cup salsa, drained of excess liquid
- Sour cream, sliced green onions, or diced tomatoes for serving, optional
How to Make Them
- Heat the oven to 375°F and lightly grease a 24-cup mini muffin pan.
- Brown the meat in a skillet over medium heat for 7 to 9 minutes. Drain any excess grease, then add the taco seasoning and water. Simmer until the liquid has cooked away. Cool slightly.
- Press one wonton wrapper into each muffin cup. Add about 1 teaspoon of cheese, 1 tablespoon of taco meat, a small dab of well-drained salsa, and another sprinkle of cheese.
- Bake for 10 to 12 minutes, until the wrapper edges are golden and the cheese is melted.
- Cool in the pan for 5 minutes, then lift the cups onto a wire rack so the bottoms stay crisp.
Travel Tip: Once completely cool, place the cups in a rigid container in a single layer. Carry sour cream and other moist toppings separately and add them after you arrive.
5. Chicken Salad Phyllo Cups
Instead of vaguely spooning chicken salad into “small cups,” this version uses crisp little phyllo shells. Tart apple, celery, and toasted pecans break up the creamy filling and keep it from tasting like beige luncheon food.
Makes: 30 cups
Make ahead: Filling up to 2 days ahead; fill the shells no more than 1 hour before serving
Ingredients
- 2 cups finely chopped rotisserie chicken
- 1/3 cup mayonnaise
- 1 tablespoon Dijon mustard
- 1 teaspoon lemon juice
- 1/3 cup finely diced celery
- 1/3 cup finely diced crisp apple
- 1/4 cup chopped toasted pecans
- 1 tablespoon chopped fresh dill or parsley
- 1/4 teaspoon salt
- Black pepper to taste
- 30 frozen mini phyllo shells, thawed according to package directions
How to Make Them
- Stir together the chicken, mayonnaise, Dijon, lemon juice, celery, apple, pecans, herbs, salt, and pepper.
- Cover and refrigerate the filling for at least 30 minutes so the flavors can settle in.
- Shortly before leaving, spoon about 1 tablespoon of chicken salad into each phyllo shell.
Travel Tip: Fit the cups snugly into a shallow lidded container so they cannot slide. Keep them cold with ice packs and avoid assembling them the night before—the shells will soften.
6. Puff Pastry Sausage Bites
Smoky sausage wrapped in flaky pastry is essentially the grown-up version of pigs in a blanket, and nobody at a football party is going to object to that. A swipe of mustard under the pastry adds flavor without requiring a bowl of dip in the car.
Makes: About 32 bites
Make ahead: Assemble and refrigerate up to 8 hours before baking
Ingredients
- 1 sheet frozen puff pastry, thawed but still cold
- 14 ounces fully cooked smoked sausage or kielbasa
- 2 tablespoons Dijon or honey mustard
- 1 egg beaten with 1 teaspoon water
- 1 teaspoon sesame or poppy seeds, optional
How to Make Them
- Heat the oven to 400°F and line a baking sheet with parchment.
- Unfold the pastry and gently roll it into a roughly 10-by-12-inch rectangle. Cut it lengthwise into four long strips.
- Brush each strip lightly with mustard. Cut the sausage into pieces about 1 inch long.
- Wrap each sausage piece with enough pastry to overlap slightly, then place it seam-side down on the baking sheet.
- Brush the tops with egg wash and sprinkle with seeds if using.
- Bake for 18 to 22 minutes, until deeply golden and puffed.
Travel Tip: Cool the bites on a rack for at least 10 minutes before packing so trapped steam does not soften the pastry. A parchment-lined bakery box is better than an airtight plastic container while they are still warm.
7. Caprese Skewers
Juicy tomatoes, milky mozzarella, and basil give the table something fresh between all the cheese dips and bacon. They are simple, but drying the ingredients well and seasoning them properly makes the difference between bright little salad bites and a watery tray of ingredients on sticks.
Makes: 24 skewers
Make ahead: Up to 6 hours
Ingredients
- 24 cherry or grape tomatoes
- 24 small mozzarella pearls or ciliegine
- 24 small basil leaves
- 2 teaspoons olive oil
- Pinch of kosher salt
- Black pepper to taste
- 2 to 3 tablespoons balsamic glaze
- 24 short appetizer picks
How to Make Them
- Drain the mozzarella and pat both the cheese and tomatoes completely dry.
- Thread one tomato, one folded basil leaf, and one mozzarella ball onto each pick.
- Arrange the skewers in a shallow dish. Drizzle very lightly with olive oil and add salt and pepper.
- Refrigerate until ready to leave.
Travel Tip: Place the skewers in a snug single layer and carry the balsamic glaze separately. Drizzle it on just before serving so the basil stays attractive and the container does not become sticky.
8. Buffalo Chicken Pinwheels
These deliver the tang and heat of buffalo chicken without requiring a stack of napkins and a defensive posture near the sofa. Cheddar and green onion round out the filling, while a short chill keeps the rolls firm enough to slice cleanly.
Makes: About 32 pinwheels
Make ahead: Up to 24 hours
Ingredients
- 8 ounces cream cheese, softened
- 2 cups finely shredded cooked chicken
- 1/3 cup buffalo sauce
- 1/2 cup shredded cheddar cheese
- 2 tablespoons ranch or blue cheese dressing
- 2 tablespoons sliced green onions
- 4 large flour tortillas
How to Make Them
- Beat the cream cheese, buffalo sauce, and dressing together until smooth.
- Fold in the chicken, cheddar, and green onions.
- Divide the filling among the tortillas and spread it evenly, leaving a narrow border on one side.
- Roll tightly, wrap each roll, and refrigerate for at least 1 hour.
- Trim the ends and cut each roll into eight pieces.
Travel Tip: Pack the pinwheels tightly enough that they cannot unroll and keep them below 40°F in a cooler. For a milder tray, use less buffalo sauce and bring extra sauce separately for the people who believe every snack should hurt a little.
9. Pepperoni, Cheese, and Pepperoncini Picks
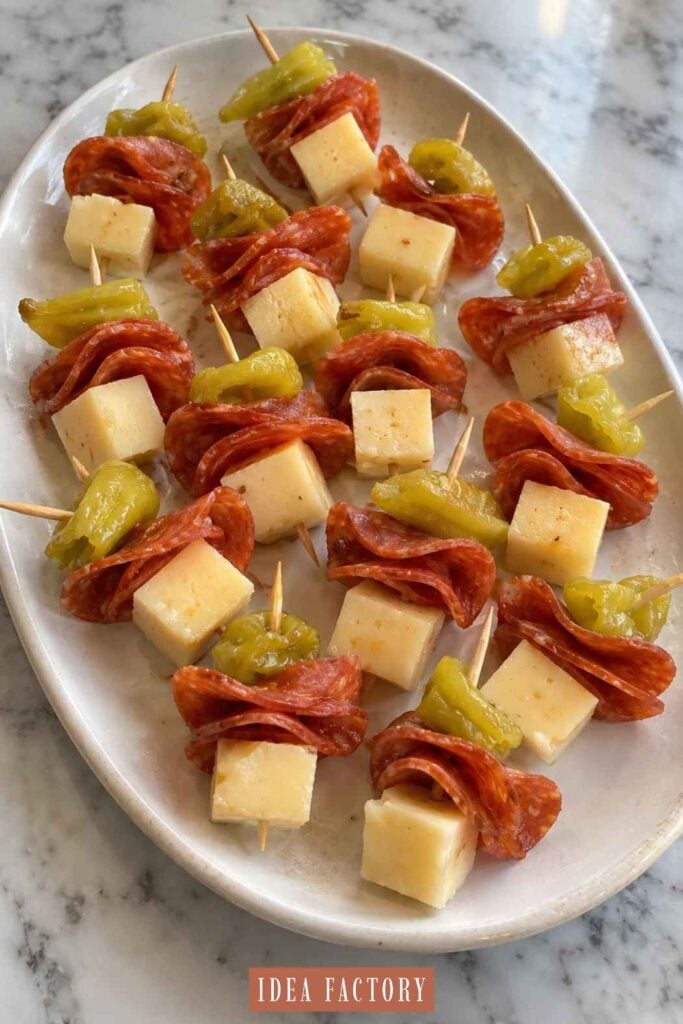
Plain cheese-and-pepperoni stacks can look a bit like emergency lunchbox food. Add a folded pepperoncini and an olive, however, and they become salty, tangy antipasto bites that disappear surprisingly fast.
Makes: 24 picks
Make ahead: Up to 1 day
Ingredients
- 24 cubes provolone, mozzarella, or cheddar
- 48 pepperoni slices
- 24 small pepperoncini pieces, patted dry
- 24 pitted olives
- 24 appetizer picks
How to Make Them
- Fold two pepperoni slices into quarters for each pick.
- Thread one cheese cube, the folded pepperoni, one pepperoncini piece, and one olive onto each pick.
- Cover and refrigerate until serving.
Travel Tip: Use a low container and arrange the picks horizontally rather than trying to make them stand upright. Pat the olives and peppers dry first so liquid does not collect in the bottom.
10. Smoky Deviled Eggs
Deviled eggs do not need bacon, truffle oil, or an identity crisis to be good. Dijon, pickle juice, and smoked paprika give this familiar version just enough tang and smoke to taste intentional while still pleasing the traditionalists.
Makes: 24 egg halves
Make ahead: Up to 1 day
Ingredients
- 12 large eggs
- 1/3 cup mayonnaise
- 2 teaspoons Dijon mustard
- 1 teaspoon pickle juice or white vinegar
- 1/4 teaspoon salt
- 1/8 teaspoon black pepper
- Smoked paprika and finely sliced chives for topping
How to Make Them
- Place the eggs in a saucepan and cover them with cold water by about 1 inch. Bring the water to a boil, cover the pan, remove it from the heat, and let the eggs stand for 11 to 12 minutes.
- Transfer the eggs to an ice bath for at least 5 minutes. Peel and halve them lengthwise.
- Remove the yolks and mash them until fine. Mix in the mayonnaise, Dijon, pickle juice, salt, and pepper until smooth.
- Spoon or pipe the filling into the whites. Finish with smoked paprika and chives.
Travel Tip: An egg carrier is the safest option. Without one, place each egg in a mini paper liner inside a shallow container. Keep the eggs cold during the drive and set out only part of the tray at a time if the party will last for hours.
11. Ham and Pickle Roll-Ups Recipe
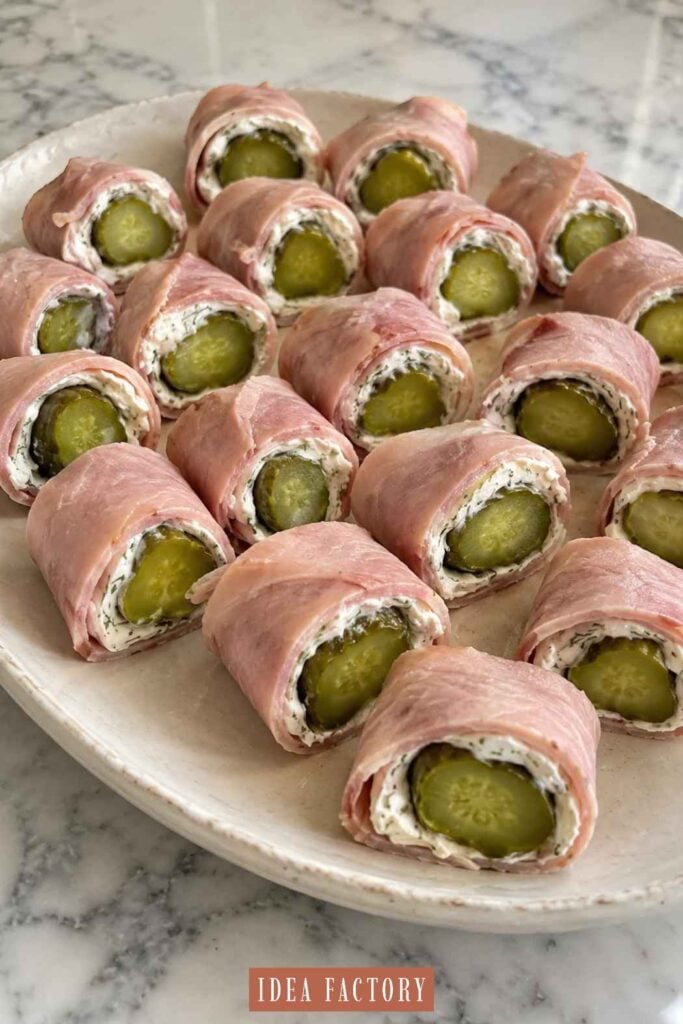
These retro little bites have earned their place at the potluck table: they are crunchy, salty, creamy, and almost impossible to ruin. A touch of Dijon and dill wakes up the filling without taking away the familiar flavor everyone expects.
Makes: About 32 pieces
Make ahead: Up to 1 day
Ingredients
- 8 ounces cream cheese, softened
- 1 teaspoon Dijon mustard
- 1 tablespoon chopped fresh dill or 1 teaspoon dried dill
- 8 large slices deli ham, patted dry
- 8 whole small dill pickles, patted very dry
How to Make Them
- Mix the cream cheese, Dijon, and dill.
- Lay the ham slices flat and blot away any moisture. Spread each with a thin layer of the cream cheese mixture.
- Place a pickle along one short edge and roll the ham around it tightly.
- Wrap and refrigerate the rolls for at least 30 minutes, then cut each into four pieces.
Travel Tip: Moisture is the enemy here, so dry the ham and pickles thoroughly. Place the cut pieces seam-side down in a snug container and keep chilled.
12. Mini Spinach and Cheddar Quiches
These crustless mini quiches are tender rather than fragile and taste just as good at room temperature as they do warm. Spinach and cheddar keep them familiar; a little onion gives them enough flavor that nobody goes hunting for hot sauce after the first bite.
Makes: 24 mini quiches
Make ahead: Up to 2 days
Ingredients
- 8 large eggs
- 1/2 cup whole milk or half-and-half
- 1/2 teaspoon salt
- 1/4 teaspoon black pepper
- 1/4 teaspoon garlic powder
- 1 cup shredded sharp cheddar cheese
- 3/4 cup frozen chopped spinach, thawed and squeezed very dry
- 1/4 cup finely diced onion
How to Make Them
- Heat the oven to 375°F and grease a 24-cup mini muffin pan very well.
- Whisk the eggs, milk, salt, pepper, and garlic powder together.
- Divide the cheddar, spinach, and onion among the muffin cups. Pour the egg mixture over the fillings, stopping just below the rims.
- Bake for 15 to 18 minutes, until the centers are set and the edges are lightly golden.
- Cool for 5 minutes, then run a thin knife around the edges and transfer the quiches to a rack.
Travel Tip: Transport them cold in a cooler or warm in an insulated carrier. Do not seal the container while the quiches are steaming. They can be served at room temperature, but they should not sit out all afternoon.
13. Herbed Cheese-Stuffed Mini Peppers
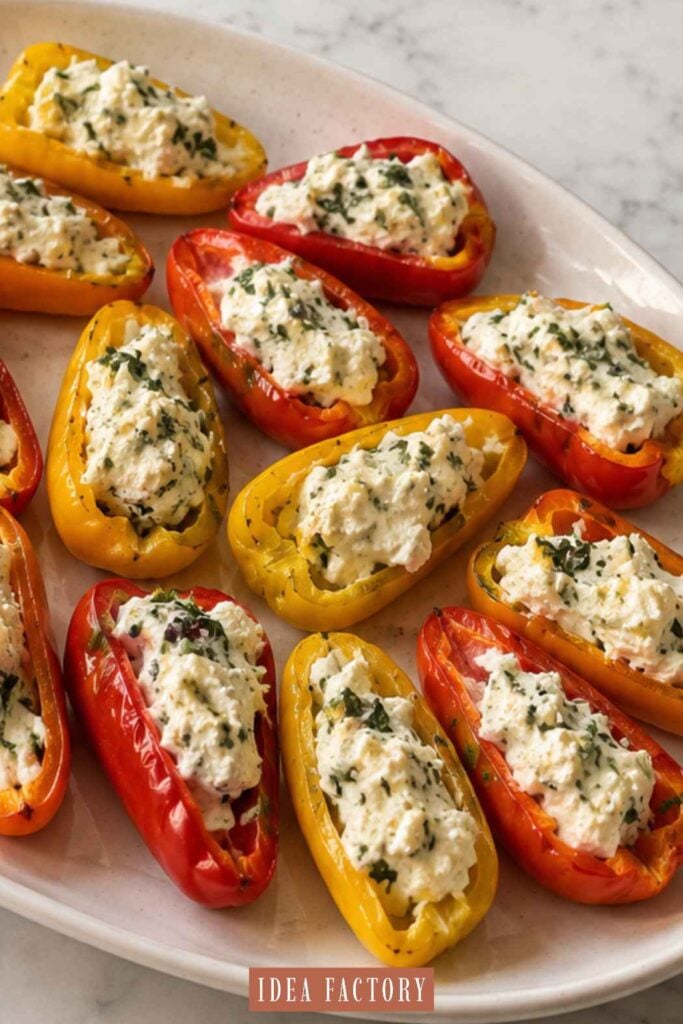
Sweet, crisp peppers make a welcome change from pastry and bread, while the lemony herb filling keeps them from feeling like the obligatory “healthy option.” Their natural boat shape also makes them unusually easy to pack.
Makes: 24 pepper halves
Make ahead: Up to 1 day
Ingredients
- 12 mini sweet peppers
- 8 ounces cream cheese, softened
- 1/3 cup crumbled feta
- 1 tablespoon lemon juice
- 2 tablespoons chopped parsley
- 1 tablespoon chopped chives
- 1/4 teaspoon garlic powder
- Black pepper to taste
- 2 tablespoons chopped toasted walnuts or everything seasoning, optional
How to Make Them
- Halve the peppers lengthwise and remove the seeds. Pat the cut sides dry.
- Mix the cream cheese, feta, lemon juice, parsley, chives, garlic powder, and pepper.
- Spoon or pipe the filling into the pepper halves. Sprinkle with walnuts or everything seasoning if desired.
Travel Tip: Arrange the peppers in alternating directions in a shallow container so they support one another. Keep chilled and wait to add a crunchy topping until shortly before leaving.
14. Antipasto Skewers
These are essentially a very tidy Italian snack board. Cheese tortellini makes them more substantial than the usual olive-and-salami pick, and the ingredients can be rearranged to use whatever you already have in the refrigerator.
Makes: 20 skewers
Make ahead: Up to 1 day
Ingredients
- 20 refrigerated cheese tortellini
- 20 small mozzarella balls
- 20 thin slices salami, folded
- 20 pitted olives
- 20 pieces roasted red pepper or pepperoncini, patted dry
- 1 tablespoon olive oil
- 1 teaspoon Italian seasoning
- 20 short skewers
How to Make Them
- Cook the tortellini according to the package directions just until tender. Drain, rinse briefly with cool water, and dry well.
- Toss the tortellini with the olive oil and Italian seasoning.
- Thread one tortellini, mozzarella ball, folded salami slice, olive, and pepper piece onto each skewer.
- Cover and refrigerate until serving.
Travel Tip: Pack the skewers flat in a snug container and keep them cold. Avoid pouring extra dressing over the tray; it makes the skewers slippery and the car ride unnecessarily dramatic.
15. Garlic Parmesan Breadstick Bites
Refrigerated pizza dough turns into soft, chewy breadstick bites with crisp edges and plenty of garlic butter. Cutting the dough into small twists makes them easier to share and much easier to transport than long breadsticks poking through the foil.
Makes: 24 bites
Make ahead: Best baked the day of the party
Ingredients
- 1 pound refrigerated pizza dough
- 3 tablespoons melted butter
- 2 garlic cloves, finely grated or minced
- 1/3 cup finely grated Parmesan cheese
- 1 teaspoon dried Italian seasoning
- 1/4 teaspoon salt
- Warm marinara for serving, optional
How to Make Them
- Heat the oven to 400°F and line a baking sheet with parchment.
- Pat the dough into a rectangle and cut it into 24 short strips. Twist each strip once or twice and arrange them on the pan.
- Stir the melted butter and garlic together. Brush half over the dough, then sprinkle with half the Parmesan.
- Bake for 12 to 15 minutes, until golden.
- Brush with the remaining garlic butter while warm and add the remaining Parmesan, Italian seasoning, and salt.
Travel Tip: Let the breadstick bites cool for 10 minutes before loosely wrapping them in foil or placing them in a bakery box. Carry marinara in a separate leakproof container and reheat it at the party if possible.
Dips, Cheese Balls, and Slow-Cooker Appetizers
16. Pepper Jelly Cream Cheese Dip
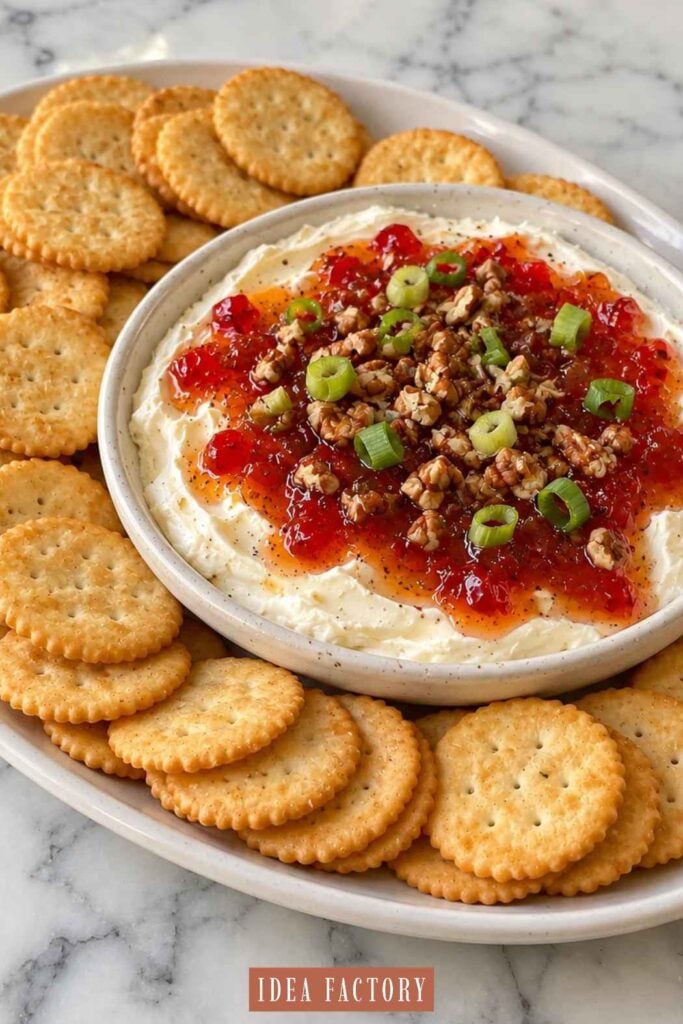
This is barely a recipe, but it earns its spot because sweet-hot pepper jelly over cool cream cheese is strangely difficult to stop eating. Seriously. Toasted pecans and green onions make it look party-ready instead of like two grocery-store packages met by accident.
Serves: 8 to 10
Make ahead: Pack the components up to 2 days ahead; assemble at the party
Ingredients
- 8 ounces cream cheese
- 1/2 to 3/4 cup red or green pepper jelly
- 2 tablespoons chopped toasted pecans
- 1 tablespoon sliced green onions
- Crackers or sturdy pretzel crisps for serving
How to Make It
- Place the cream cheese on a small rimmed serving plate or spread it into a shallow dish.
- Spoon the pepper jelly over the top.
- Sprinkle with pecans and green onions just before serving.
Travel Tip: Carry the unopened or chilled components separately and assemble this after you arrive. Pack the crackers in their own container so one leaky lid does not take out the entire appetizer.
17. Slow-Cooker BBQ Meatballs
The familiar grape-jelly version has its loyalists, but these use barbecue sauce, cranberry sauce, and Dijon for a tangy-sweet glaze with a little more personality. They are still gloriously uncomplicated and built for toothpicks.
Serves: 10 to 12
Make ahead: Up to 2 days
Ingredients
- 32 ounces frozen fully cooked meatballs
- 18 ounces barbecue sauce
- 1 cup canned whole-berry cranberry sauce
- 1 tablespoon Dijon mustard
- 1 teaspoon Worcestershire sauce
How to Make Them
- Whisk the barbecue sauce, cranberry sauce, Dijon, and Worcestershire together in a 4- to 6-quart slow cooker.
- Add the frozen meatballs and stir to coat.
- Cover and cook on LOW for 3 to 4 hours or HIGH for about 2 hours, stirring once or twice, until the meatballs are hot throughout.
- Switch the cooker to WARM for serving.
Travel Tip: Secure the lid with slow-cooker bands or place the insert in an insulated carrier. Keep the cooker level on the floor of the car, not on a seat. If you make the meatballs ahead and chill them, reheat them fully on the stove or in the oven before transferring them to the slow cooker; a slow cooker is designed to hold hot food, not quickly reheat a cold batch.
18. Everything Bagel Cheese Ball
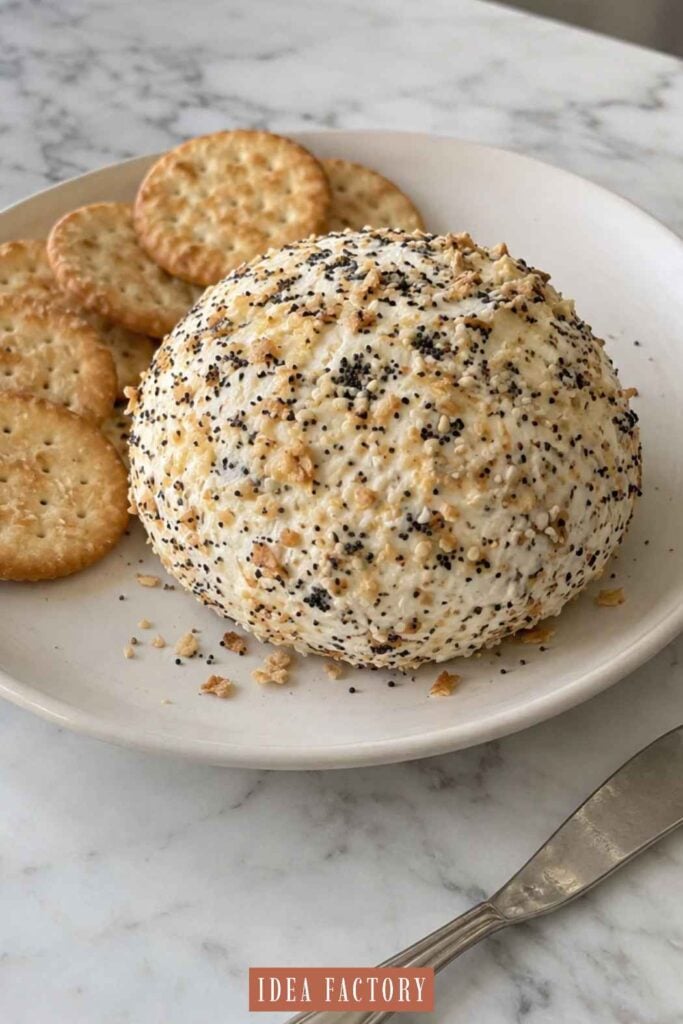
Cream cheese, sharp cheddar, chives, and plenty of everything seasoning make this taste like the savory half of a very good bagel. Unlike a hot dip, it is in no hurry and can wait patiently in the cooler until everyone is ready to snack.
Serves: 10 to 12
Make ahead: Up to 3 days
Ingredients
- 16 ounces cream cheese, softened
- 1 cup shredded sharp cheddar cheese
- 2 tablespoons sliced chives or green onions
- 1 teaspoon Worcestershire sauce
- 1/2 teaspoon garlic powder
- 1/4 teaspoon onion powder
- 1/3 cup everything bagel seasoning
- Crackers, pretzel crisps, or sliced vegetables for serving
How to Make It
- Beat the cream cheese, cheddar, chives, Worcestershire, garlic powder, and onion powder together until evenly combined.
- Scrape the mixture onto plastic wrap and use the wrap to shape it into a ball. Refrigerate for at least 1 hour.
- Just before leaving, spread the everything seasoning on a plate and roll the cheese ball in it, pressing gently so the seasoning adheres.
Travel Tip: Transport the wrapped cheese ball in a small rigid container inside a cooler. Carry crackers separately, and let the cheese ball stand for 15 to 20 minutes before serving so it is easier to spread.
19. Baked Spinach Artichoke Dip
This is the bubbling, golden-edged dip people hover around while pretending to watch the game. Artichokes give it a little tang, spinach makes it seem marginally virtuous, and three cheeses ensure nobody actually mistakes it for health food.
Serves: 10 to 12
Make ahead: Assemble up to 1 day ahead
Ingredients
- 8 ounces cream cheese, softened
- 1/2 cup sour cream
- 1/3 cup mayonnaise
- 1 cup shredded mozzarella cheese, divided
- 1/2 cup grated Parmesan cheese, divided
- 1 can (14 ounces) artichoke hearts, drained and chopped
- 10 ounces frozen chopped spinach, thawed and squeezed very dry
- 2 garlic cloves, minced
- 1/4 teaspoon salt
- 1/4 teaspoon black pepper
- Tortilla chips, pita chips, or toasted baguette slices for serving
How to Make It
- Heat the oven to 375°F.
- Mix the cream cheese, sour cream, mayonnaise, 3/4 cup mozzarella, 1/4 cup Parmesan, artichokes, spinach, garlic, salt, and pepper.
- Spread the dip in a 1 1/2-quart baking dish and top with the remaining mozzarella and Parmesan.
- Bake for 25 to 30 minutes, until hot and bubbling around the edges. Broil for 1 to 2 minutes if you want a more deeply browned top.
Travel Tip: For a short drive, cover the hot dish with foil and place it in an insulated carrier. For a longer trip, chill the unbaked dip and bake it at the destination if the host has oven space. Bring the dippers separately so they stay crisp.
20. Sweet and Spicy Kielbasa Bites
These glossy little sausage bites hit the sweet-salty-spicy combination that makes people keep wandering back for “just one more.” Apricot preserves bring a brighter flavor than grape jelly, and mustard keeps the sauce from becoming candy-sweet.
Serves: 10 to 12
Make ahead: Up to 2 days
Ingredients
- 2 pounds fully cooked kielbasa, cut into 1/2-inch slices
- 1 cup chili sauce
- 3/4 cup apricot preserves
- 2 tablespoons Dijon mustard
- 1 tablespoon apple cider vinegar
- 1/4 teaspoon red pepper flakes, or more to taste
How to Make Them
- Whisk the chili sauce, preserves, Dijon, vinegar, and pepper flakes together in a slow cooker.
- Add the kielbasa and stir until coated.
- Cover and cook on LOW for 2 to 3 hours, until hot, then switch the cooker to WARM.
Travel Tip: Transport these exactly as you would the meatballs: in a securely closed slow cooker, kept upright in an insulated carrier. Pack toothpicks and a small discard bowl so used picks do not migrate around the snack table.
21. Baked Brie With Apricot Jam and Pecans
Warm brie topped with bright apricot jam and buttery pecans feels fancy without requiring puff pastry origami. It stays soft for a while after baking, although it will gradually firm as it cools—so this is best for a shorter drive or a party with an available oven.
Serves: 8
Make ahead: Assemble a few hours ahead; bake shortly before serving
Ingredients
- 1 small wheel brie, about 8 ounces
- 1/3 cup apricot preserves
- 1/4 cup chopped pecans
- 1 teaspoon fresh thyme leaves, optional
- Crackers or sliced baguette for serving
How to Make It
- Heat the oven to 375°F. Place the brie in a small oven-safe baking dish; leave the rind intact so the cheese holds its shape.
- Spoon the preserves over the top and sprinkle with pecans.
- Bake for 12 to 15 minutes, until the center feels soft when gently pressed.
- Add thyme, if using, and let the brie rest for 5 minutes before serving.
Travel Tip: Carry it in the baking dish inside an insulated carrier. It will still taste good at room temperature, but it will not remain molten indefinitely. If the drive is long, assemble it at home and bake it after you arrive. Carry crackers separately.
Crunchy Snacks and Savory Bites
22. Ranch Pretzel Mix
This is the bowl people absentmindedly demolish while talking. Buttery ranch seasoning clings to pretzels, crackers, and cereal, and a low oven makes everything crisp rather than greasy.
Makes: About 12 cups
Make ahead: Up to 1 week
Ingredients
- 5 cups mini pretzels
- 3 cups oyster crackers or cheese crackers
- 3 cups square rice or corn cereal
- 1 cup roasted peanuts, optional
- 1/2 cup neutral oil or melted butter
- 1 packet (1 ounce) dry ranch seasoning
- 1 teaspoon dried dill
- 1/2 teaspoon garlic powder
How to Make It
- Heat the oven to 250°F. Combine the pretzels, crackers, cereal, and peanuts in a large bowl.
- Whisk the oil or butter with the ranch seasoning, dill, and garlic powder.
- Pour the mixture over the snacks and toss until everything is evenly coated.
- Spread it across two rimmed baking sheets and bake for 40 to 45 minutes, stirring every 15 minutes.
- Cool completely before storing.
Travel Tip: Once completely cool, pour the mix into an airtight container or zip-top bags. Do not seal it while it is even slightly warm or the trapped moisture will steal the crunch.
23. Cheddar Jalapeño Cornbread Bites
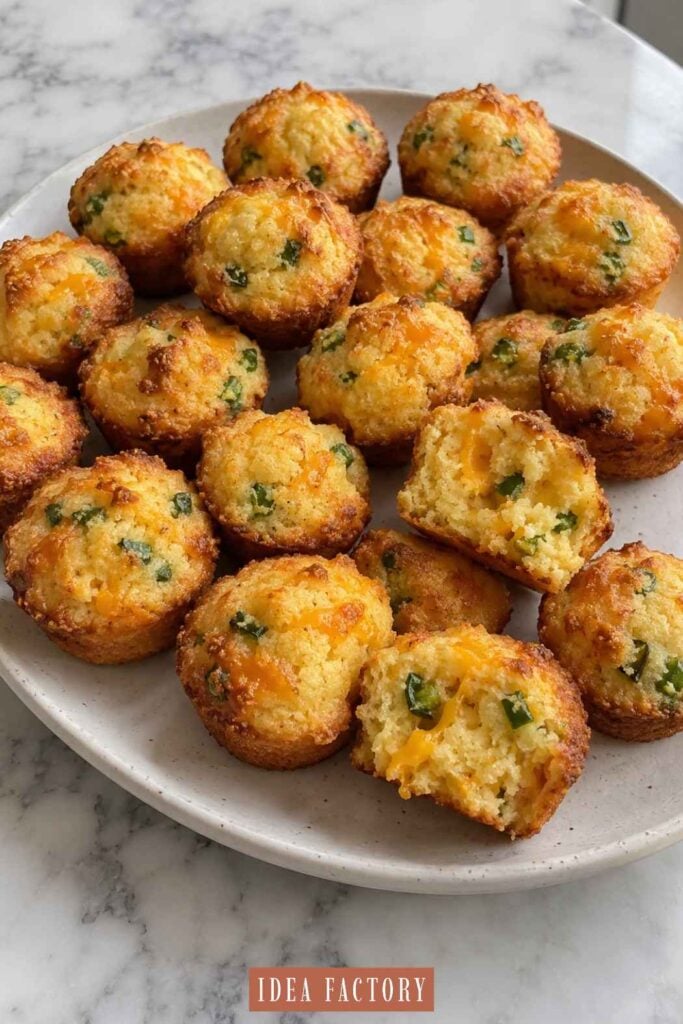
These are seriously yummy! These mini muffins have crisp golden edges, a soft center, sharp cheddar, and a gentle jalapeño kick. They are especially good beside chili, but they can also hold their own on an appetizer table with a bowl of honey butter.
Makes: 24 mini muffins
Make ahead: Up to 2 days
Ingredients
- 1 cup yellow cornmeal
- 1 cup all-purpose flour
- 1 tablespoon baking powder
- 1/2 teaspoon salt
- 1 cup milk
- 1 large egg
- 1/4 cup melted butter
- 2 tablespoons honey
- 1 cup shredded sharp cheddar cheese
- 1 small jalapeño, seeded and finely diced
How to Make Them
- Heat the oven to 375°F and grease a 24-cup mini muffin pan.
- Whisk the cornmeal, flour, baking powder, and salt in a large bowl.
- In another bowl, whisk the milk, egg, melted butter, and honey.
- Pour the wet mixture into the dry mixture and stir just until combined. Fold in the cheddar and jalapeño.
- Divide the batter among the muffin cups and bake for 11 to 14 minutes, until the edges are golden and a toothpick comes out clean.
- Cool for 5 minutes before transferring the muffins to a rack.
Travel Tip: A bakery box or rigid container keeps these from being crushed. Cool them completely before closing the lid. They are excellent at room temperature, so there is no need to compete for oven space at the party.
Easy Potluck Desserts
24. Chocolate-Covered Pretzel Rods
They are salty, snappy, chocolatey, and easy to customize with team colors without turning your kitchen into a full-scale baking operation. Pretzel rods also travel better than delicate cookies and do not need to be cut or plated at the party.
Makes: 20 pretzel rods
Make ahead: Up to 1 week
Ingredients
- 20 pretzel rods
- 12 ounces chocolate melting wafers or chopped semisweet chocolate
- 1 teaspoon coconut oil, optional
- Sprinkles, chopped nuts, or contrasting melted chocolate for decorating
How to Make Them
- Line two baking sheets with parchment.
- Melt the chocolate according to the package directions or in the microwave in 20-second intervals, stirring after each. Stir in coconut oil if the chocolate needs thinning.
- Spoon chocolate over the upper half of each pretzel rod, turning it until coated. Gently tap off the excess.
- Place the rods on the parchment and add sprinkles or nuts before the chocolate sets.
- Let them firm completely at cool room temperature.
Travel Tip: Layer the rods between parchment in a rigid container and keep them away from direct sun or a hot car. Refrigeration can create condensation on the chocolate, so a cool room is better unless your kitchen is very warm.
25. Salted Fudge Brownie Bites
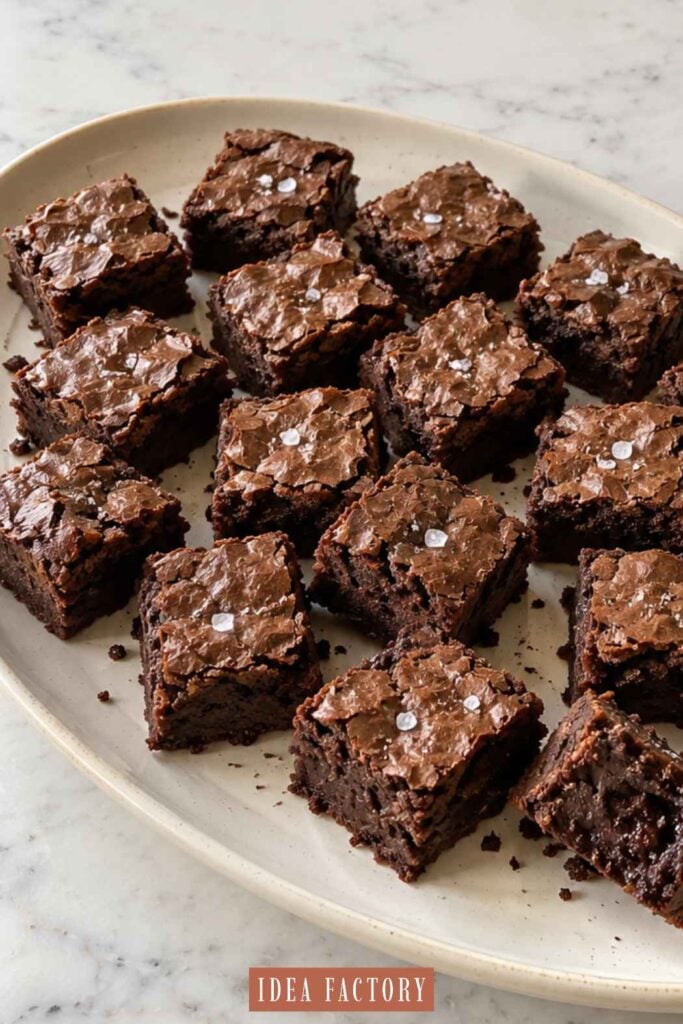
Brownies may be the least surprising dessert on the table, but they are also usually the first empty container. Cutting them small gives everyone permission to take one now and another during the fourth quarter.
Makes: 30 to 36 bites
Make ahead: Up to 3 days
Ingredients
- 1 box fudge brownie mix, plus the ingredients listed on the package
- 1/2 cup semisweet chocolate chips, optional
- 1/2 teaspoon flaky sea salt, optional
How to Make Them
- Prepare the brownie batter according to the package directions and fold in the chocolate chips if using.
- Spread the batter in a parchment-lined metal pan in the size directed on the package. Bake according to the package directions, checking at the earliest suggested time so the brownies stay fudgy.
- Sprinkle lightly with flaky salt as soon as they come out of the oven.
- Cool completely in the pan. For especially clean cuts, chill the brownies for 30 minutes, lift them out by the parchment, and use a large sharp knife to cut them into small squares. Wipe the blade between cuts.
Travel Tip: Place parchment between the layers and use a rigid container with very little empty space. Skip powdered sugar—it tends to disappear into moist brownies or dust everything in the container by the time you arrive.
Frequently Asked Questions
What Can I Make the Night Before?
The easiest night-before choices are the sausage pinwheel rolls, buffalo chicken pinwheel rolls, ham and pickle roll-ups, everything bagel cheese ball, ranch pretzel mix, antipasto skewers, stuffed mini peppers, deviled eggs, chocolate-covered pretzels, and brownie bites.
For pinwheels, refrigerate the rolls whole and slice them shortly before leaving. Prepare chicken salad ahead but wait to fill the phyllo shells. Cook taco meat in advance, but bake the wonton cups on party day. Anything crisp should be completely cool before it goes into a closed container.
How Do I Keep Hot Appetizers Warm in the Car?
For a short drive, bake the food shortly before leaving, cover it once the excess steam has escaped, and place the dish in an insulated carrier. Slow-cooker recipes are easiest to manage because the hot insert can travel in an insulated carrier and be plugged in as soon as you arrive.
Put the slow cooker or baking dish on the vehicle floor where it can sit level. A rubber-backed mat or folded towel underneath helps prevent sliding. Never balance a warm casserole on a sloped car seat and trust one piece of foil to manage the situation.
For a long drive, cold transport is often safer and more predictable. Chill the cooked food promptly, carry it in a cooler, and reheat it thoroughly at the destination—provided you have confirmed that oven or microwave space will be available.
How Do I Keep Cold Appetizers Cold Without Ruining Them?
Use a well-insulated cooler packed with frozen gel packs, and place the food in already cold. A cooler maintains temperature; it does not quickly chill a tray that went into it warm.
Keep delicate foods in rigid lidded containers above loose ice so they are not crushed or soaked. When possible, carry garnishes, dressings, and sauces separately. At the party, serve cold foods in smaller batches and replenish the platter from the refrigerator or cooler instead of putting everything out at once.
How Long Can Party Food Sit Out?
Perishable foods such as meat, eggs, dairy, cooked poultry, and mayonnaise-based dishes should stay at 40°F or colder when served cold, or 140°F or warmer when held hot. The USDA advises discarding perishable food that has spent more than 2 hours at room temperature—or more than 1 hour when the temperature is above 90°F.
The clock includes the drive and any time the food spent on the kitchen counter before you left. If a game or party will run all afternoon, use smaller serving trays and refill them instead of leaving the entire batch out.
What Should I Bring If I Do Not Know Whether an Oven Is Available?
Choose something intended to be served cold or at room temperature: a cheese ball, pinwheels, stuffed peppers, antipasto skewers, ranch pretzel mix, cornbread bites, chocolate-covered pretzels, or brownies. Never assume the host has spare oven space during a party. Even a very friendly host may already have three dips, a tray of wings, and someone else’s mysterious foil-covered casserole competing for it.
What Are the Best Appetizers for a Long Drive?
For trips longer than an hour, choose food whose texture is not temperature-dependent. Ranch pretzel mix, brownie bites, chocolate-covered pretzels, a well-chilled cheese ball, cornbread bites, and tightly packed pinwheels are all reliable choices.
Cold perishable foods still need a cooler with plenty of ice or frozen gel packs. Avoid carrying a freshly baked crisp appetizer in a tightly sealed container for a long drive; the trapped steam will soften it long before you arrive.
Final Thoughts
A good traveling appetizer does not have to be elaborate. It needs a little flavor, a container that makes sense, and a plan for what happens between your kitchen and the serving table.
If you are unsure what to bring, choose something you can finish the night before and serve without borrowing the host’s oven. Pack wet toppings separately, let hot baked foods release their steam before covering them, and keep perishable dishes properly cold or hot. Then put the container somewhere flat in the car—and take the first turn gently.